Hosting Build Artifacts on AWS
With JCenter closing down folks are looking at alternative places to host their build artifacts, and AWS can easily meet that need. AWS isn’t the only platform capable of hosting Maven artifacts, any hosting provide can do it, but AWS has the ability to scale to high levels and offers a free tier which means that you can get started very cheaply and, if your libraries are really successful, you don’t need to revisit the set-up unless you want to.
The first part of this post will cover setting up AWS to serve your libraries, if you have another hosting provider you’re happy with you can skip to the section which describes where to put your files so that build tools will be able to find the files they need.
Create an AWS Account
If you don’t already have one you will need to create an AWS Account.
Decide on whether you’ll use a custom domain name
The reason you need to think about this now is because it will affect the name of the S3 bucket you create below. Personally I would recommend using your own domain, this allows you to move the hosting around if you want to without all of your libraries users needing to update their configuration. It’s not absolutely necessary though, so if you’re running through this post to see how things work you shouldn’t feel the need to go and register a domain.
If you already have a DNS domain registered you will need to be able to create a DNS CNAME
record. This is something your domain registrar should have instructions for, and the instructions
will vary between domain name registrars. If you want to keep everything in AWS you can use
AWS Route 53 which will do the job.
Setting up the Simple Storage Service (S3)
Go to the S3 control panel and create a bucket with either the domain name you want to serve your artifacts from, or, if you don’t want to use a custom domain name, a short name which will be the start of the URL you provide your libraries from.
The AWS region you want to use is entirely up to you. I’m in the UK, so I use “EU (London) eu-west-2”
out of habit. If you think your library will appeal to folk in a certain area you might want to use
a region close to where your users are (e.g. for a library focused on supporting the Hindi language,
you might want to use “Asia Pacific (Mumbai) ap-south-1” so downloads are slightly faster for users
in India).
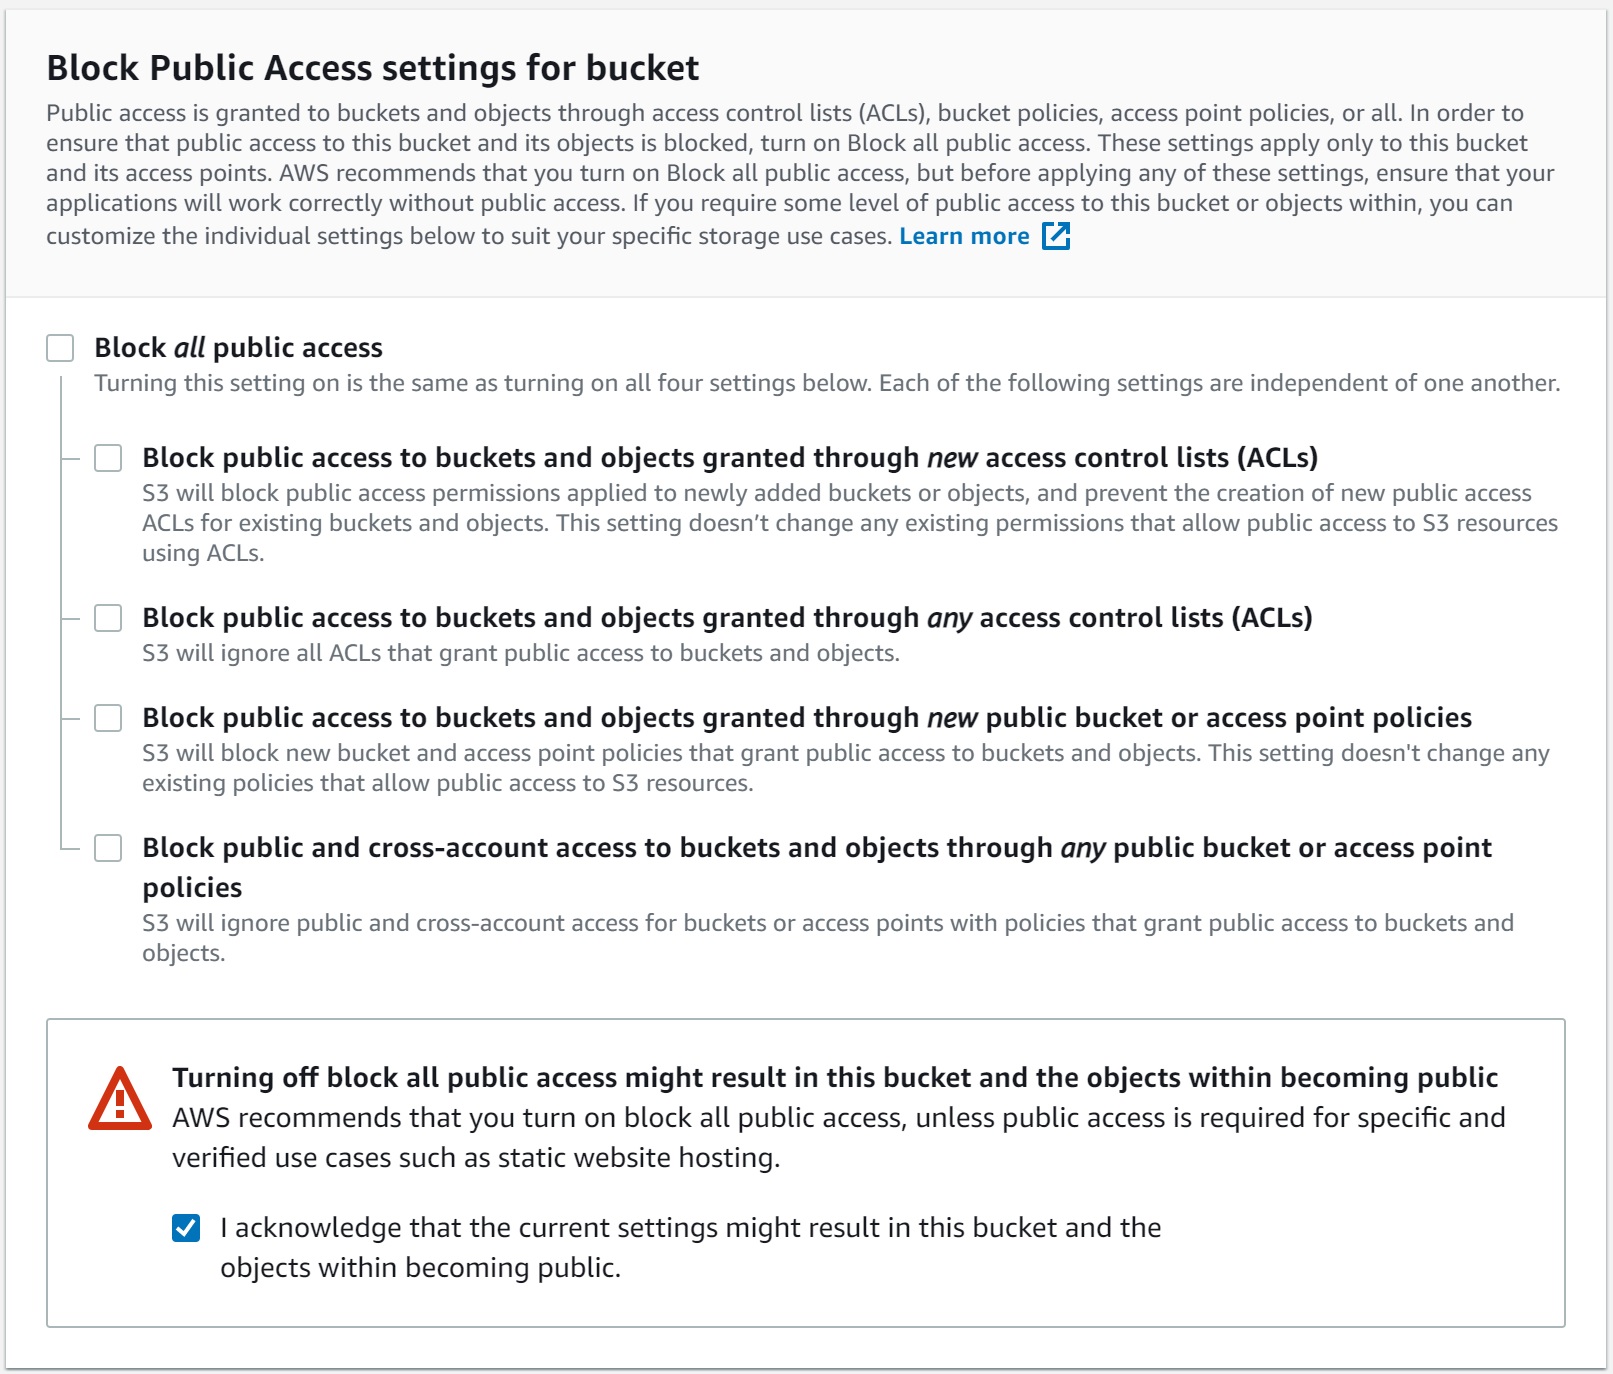
You should make sure you turn off “Block Public Access settings for bucket”. You want your artifacts to be available publicly, and this setting prevents that, so it needs to be switched off. You will need to click the acknowledgement box to confirm that you want to be able to make things uploaded to your bucket available to everyone.
You can then scroll to the bottom of the page and click “Create Bucket” to create the bucket.
Turn on “Static website hosting”
To serve files from the bucket to your users you’ll need to turn on “Static website hosting”. You can do this by clicking on the bucket in the bucket list in the S3 control console, then clicking on the “Properties” option;
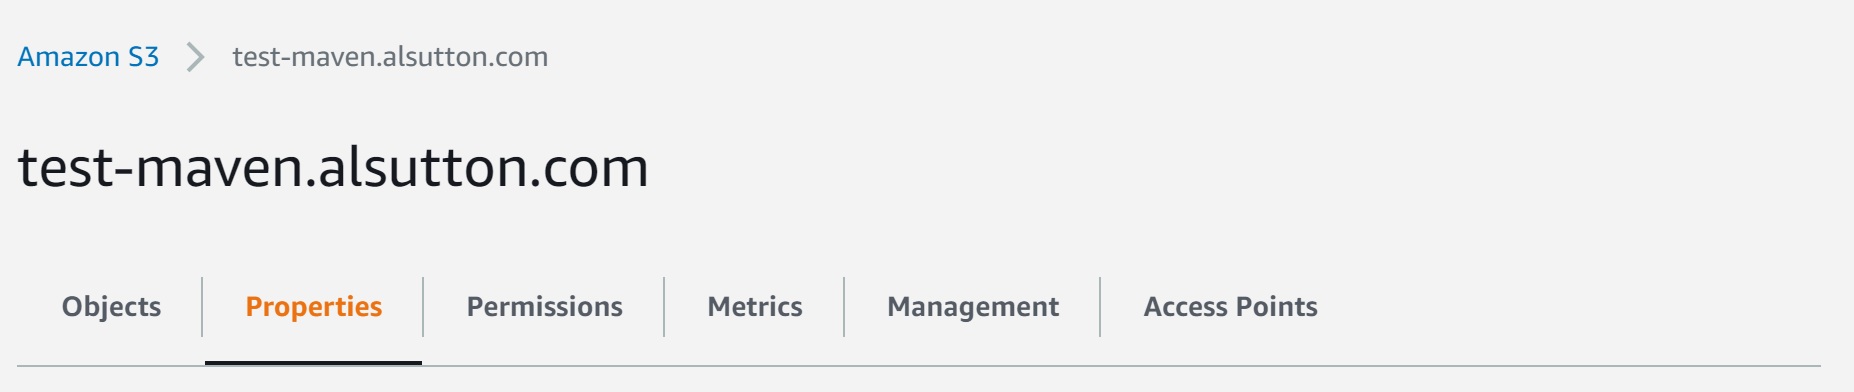
Then scroll to the bottom of the page where you’ll see the “Static website hosting” option.
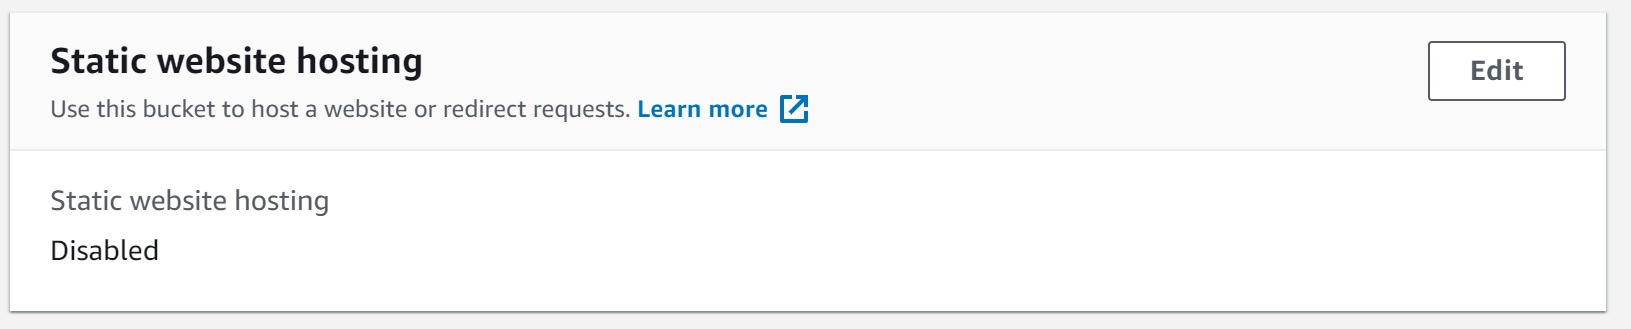
If it says “Disabled” you will need to click the “Edit” button, change the
value to “Enabled”, leave the “Hosting Type” option set to “Host a static website”,
enter index.html in the box titled “Index Document”, and then click “Save Changes”
Once you’ve done this you can scroll to the bottom of the bucket properties to
confirm that static hosting is now turned on for the bucket. This is also where
you’ll find the URL which S3’s web serving service has associated with your
bucket (for this example it’s
http://test-maven.alsutton.com.s3-website.eu-west-2.amazonaws.com).
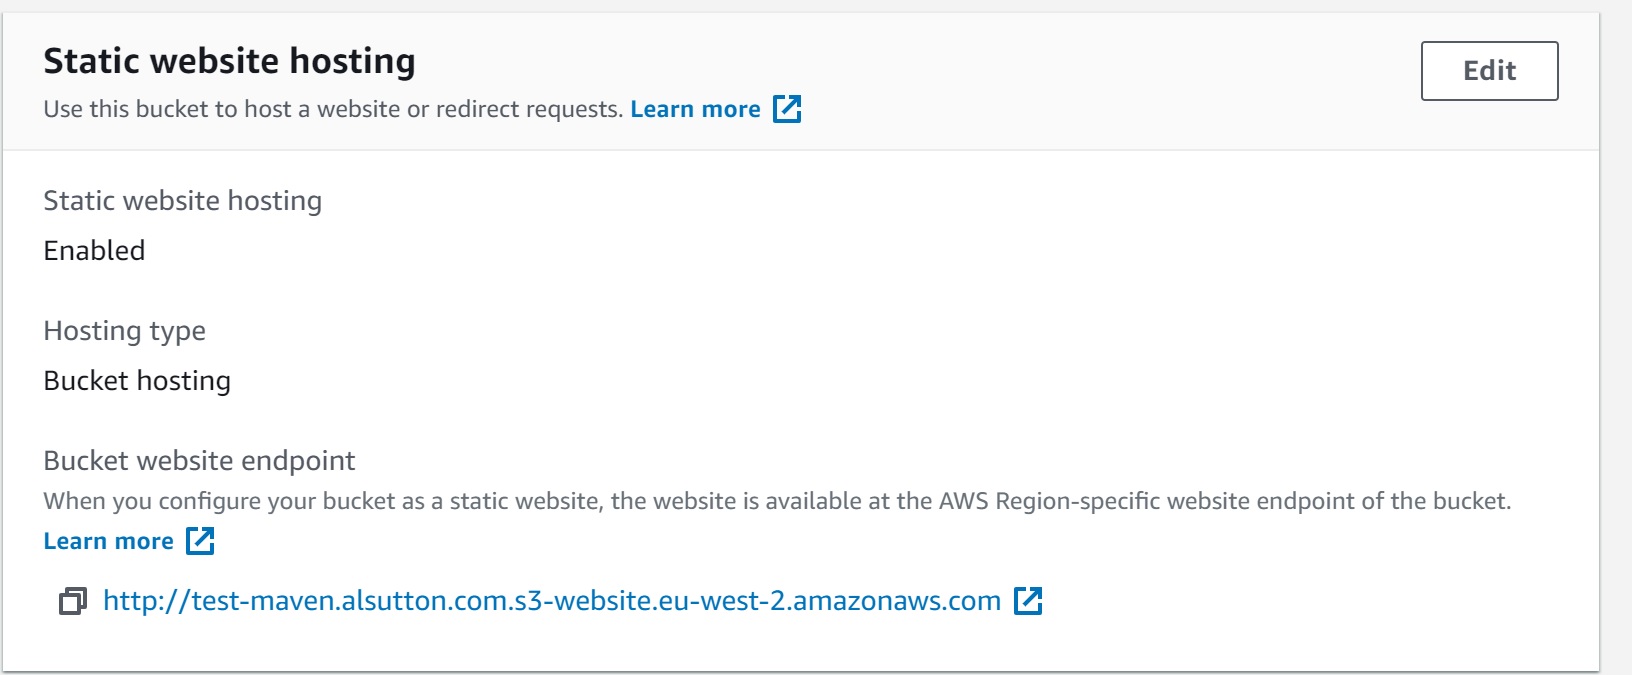
If you’ve decided not to use a custom domain this is the URL you’ll give folk who want to use your library.
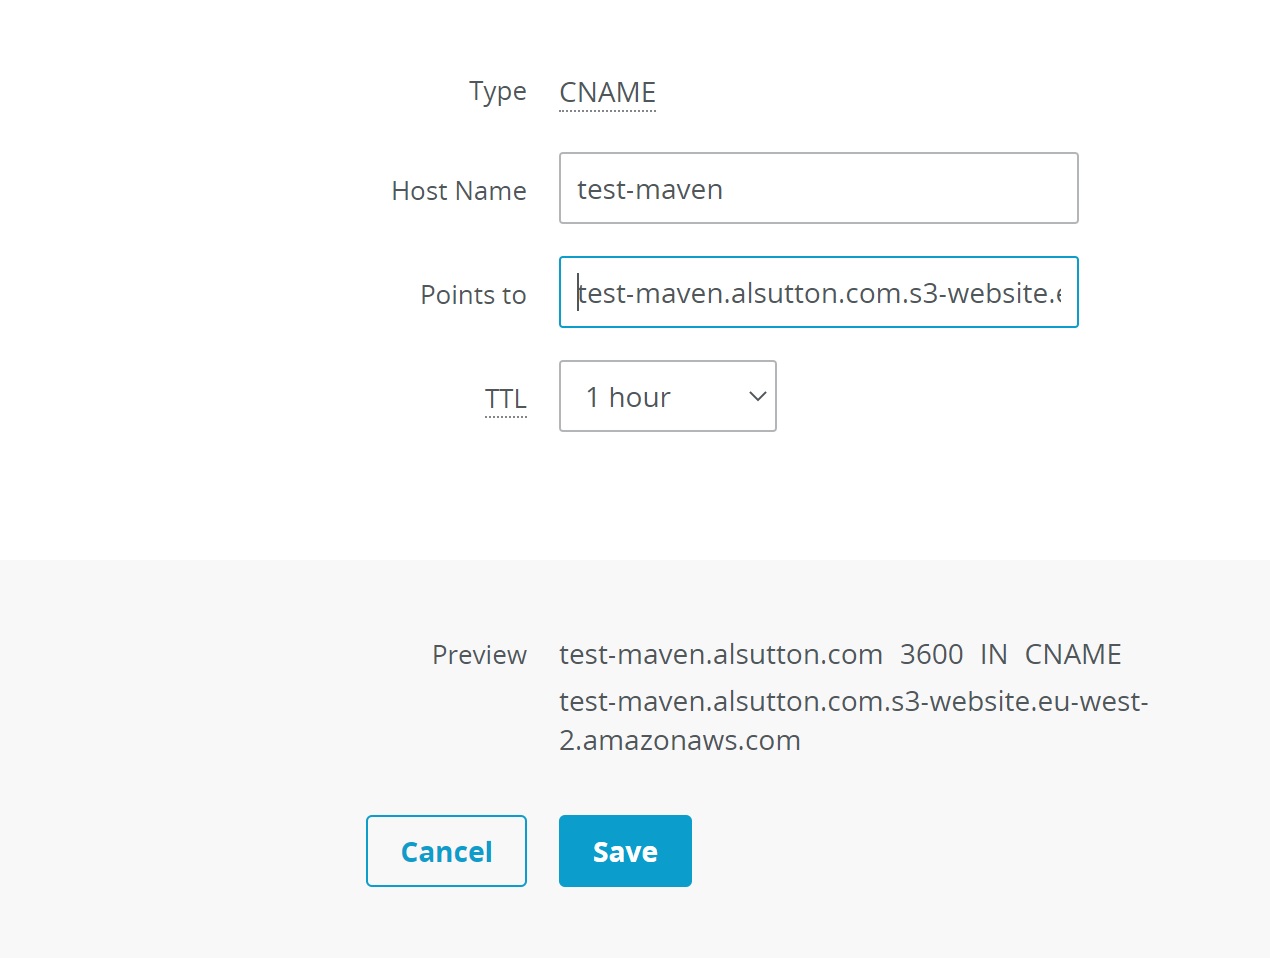
Custom Domain Update
If you’ve chosen to use a custom domain, this is where you need to go to your
DNS registrar and create the CNAME mentioned earlier. Your CNAME will map
the domain you want to make public to the s3 web serving domain that you saw
at the end of the last section.
For the example domain above (test-maven.alsutton.com) I would create a CNAME
record which points to test-maven.alsutton.com.s3-website.eu-west-2.amazonaws.com.
Warning: The Domain Name System (DNS) caches both successful and failed look-ups. When
you create your CNAME it may be some time before everyone in the world can see it,
and, similarly, if you update the CNAME the change make take a while to propagate,
so don’t be surprised if you can’t use your custom domain immediately. It’s a good
idea to allow a day or two between setting everything up and letting folk know about
the domain.
A quick test
We can test to see if our S3 backed web serving is working by uploading a simple
HTML index page and trying to access it. You can create an index.html file
which contains <html><body><H1>IT WORKED!!!!!!!!</H1></body></html>, and
use the S3 control panel to
upload it to your bucket (Click on the bucket name, then click on the “upload”
button and follow the instructions).
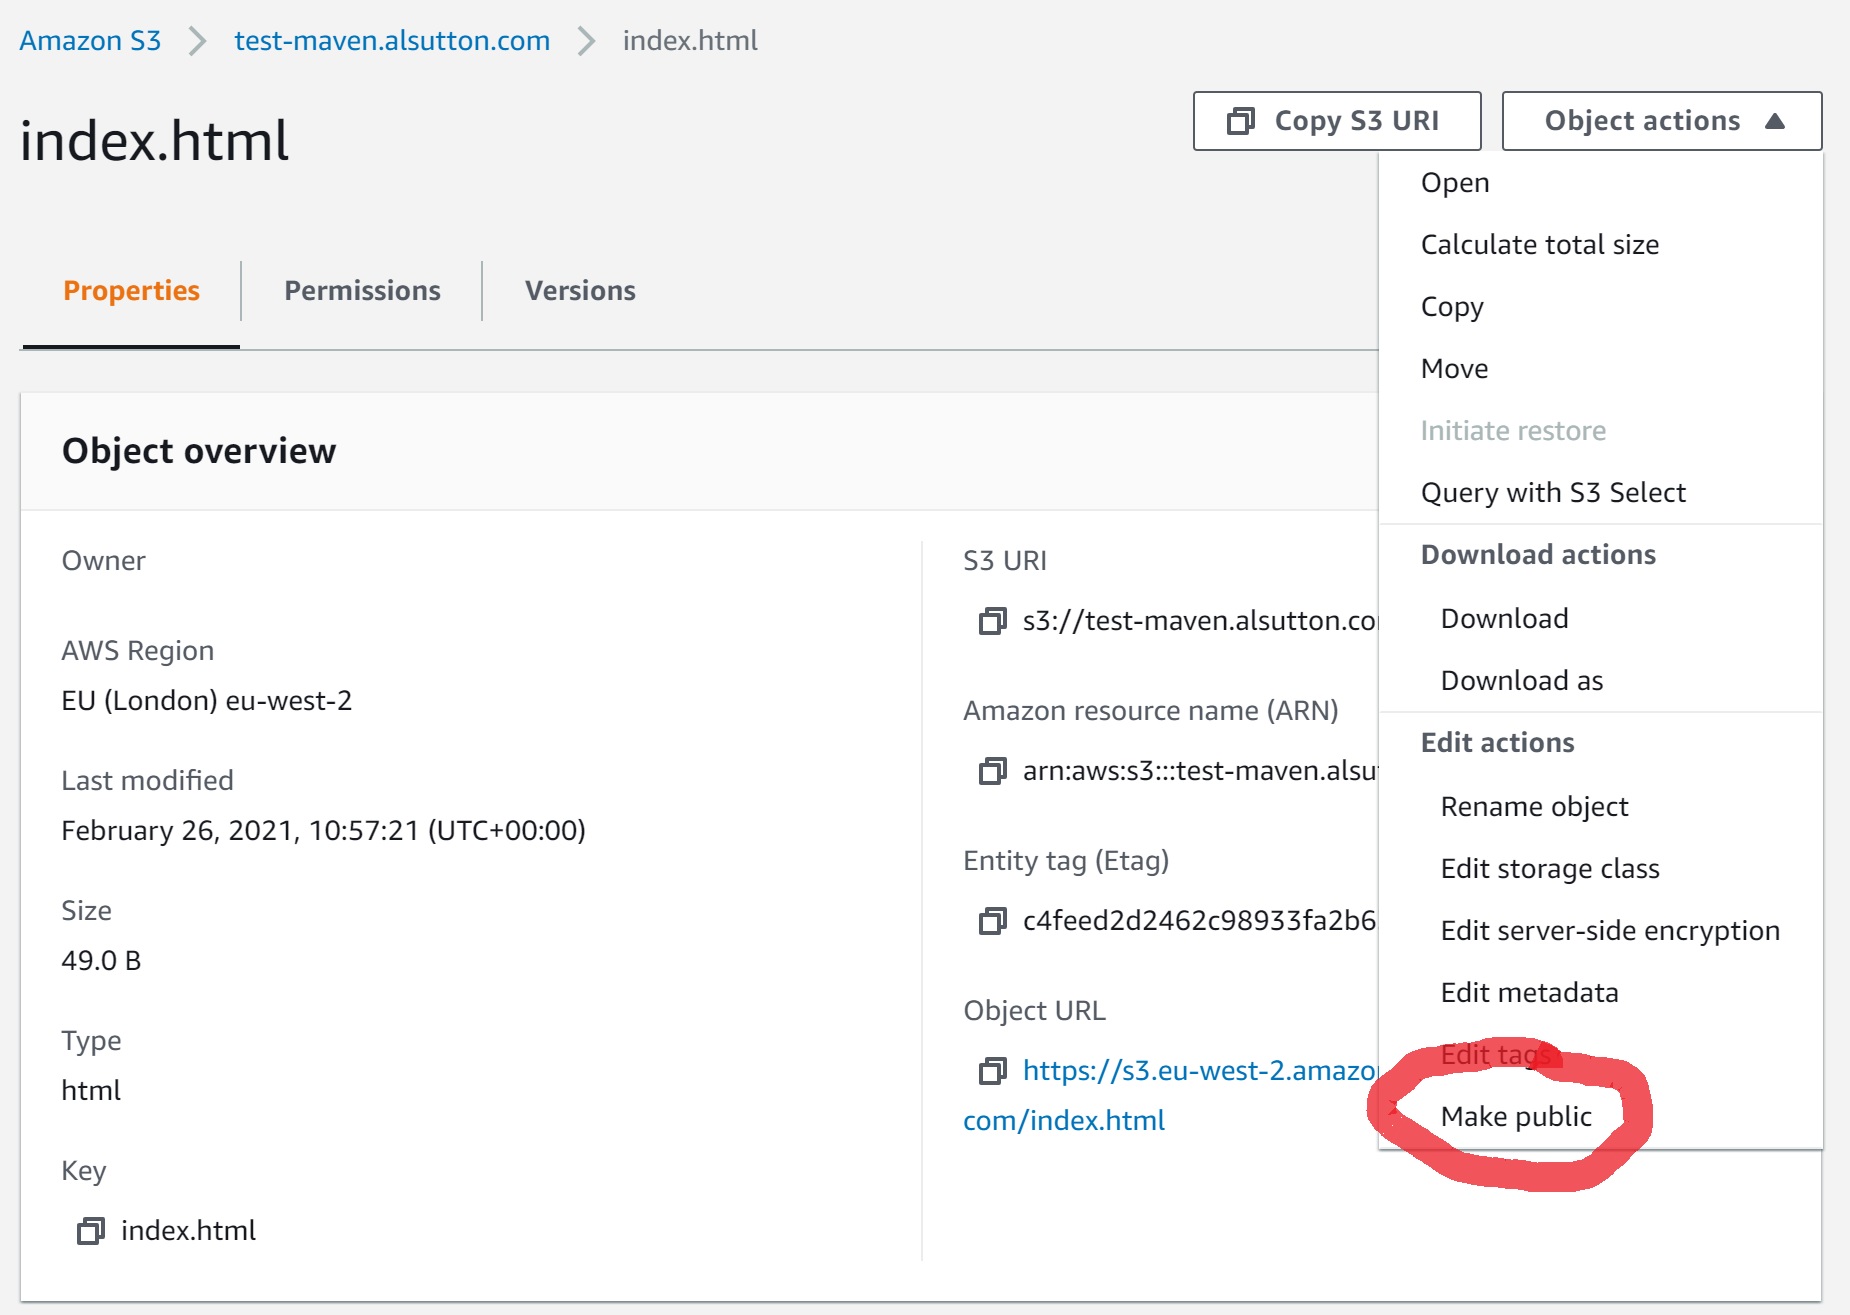
You now need to make the file available to everyone. The S3 control panel
is a bit clumsy when it comes to editing permissions, so you’ll need to click on
the index.html file you’ve just uploaded, then select “Make Public” from the
“Object Actions” menu, then confirm your choice by clicking the “Make Public”
button.
If the DNS CNAME has propagated to your local DNS servers you should be
able to access your test page using the URL http://{your domain}/index.html. If
you get an error saying the domain does not exist the CNAME creation may not
have reached your servers yet, and if you get an error starting 40 (usually 404
or 403) it means that you should check you made the index.html public in the S3
control panel.
Folder Layout
Ensuring your library files are in the right place is the most important thing to get right. If you get it wrong, your library artifacts won’t be found by any build tool.
Fortunately it’s easy to translate an artefact name into the correct layout; You
need to create a nested set of folders with one for each section of the “group” which has a dot
(.) between them, then another folder for the artefact name, then a final folder for the version,
which is where you place your release files which we’ll create below.
For example, for com.alsutton:java-cryptography-wrapper:1.0 all of the relevant
files go in com/alsutton/java-cryptography-wrapper/1.0/. For com.alsutton:java-cryptography-wrapper:1.1
they would go in com/alsutton/java-cryptography-wrapper/1.1/ and so on.
Inside Amazons S3 control panel you can create each folder using the “Create Folder” button, and when you’ve created the right structure you should see something like this;

Creating the files to upload
If you’re using Gradle you can make use of the Maven Publishing Plugin to create the files you need to make available. If you’re unsure of how to configure the plugin you can use the configuration from one of my projects as a template.
With the Gradle Maven Publishing Plugin configured you should now be able to create the maven artifacts locally by running the following command;
$ gradlew publishToMavenLocal
This will create a set of files in a local folder which is usually inside “{your_home_directory}/.m2/repository/”
and, from there, follows the same folder layout we created in the section above (e.g. com/alsutton/java-cryptography-wrapper/1.0).
Uploading the files
Now you’ve found your files you will need to upload them to your S3 bucket and make them public in the same way we uploaded the index.html file for our earlier test. You will need to make sure that these files (.module, .pom, etc.) are uploaded and public for other people to be able to find your library. If any of these are missing, or aren’t public, users will see errors such as being told there was a “403 error” fetching your library.
To make things easier for users you should also upload and make public the maven metadata file that’s available one
folder above the other files. When you publish locally you will get a folder called maven-metadata-local.xml,
you will need to rename this maven-metadata.xml before uploading it to the same location that it’s in on your local
machine (so in the artefact_name folder, not in artefact_name/1.0).
Using your new repository
Congratulations, your library is now available!
If you’re targeting folk who use gradle they will need to add in your repository to their builds. They can do this by adding the following to their gradle build files;
repositories {
    maven {
        url = uri("http://{your_domain}/")
    }
}
They can now reference your library using gradle’s normal dependency declaration (e.g., for the artefact
in the “Folder Layout” section, they would add implementation("com.alsutton:java-cryptography-wrapper:1.0")).
(optional) Going Next Level - Content Delivery Network and HTTPS
So far what we have will only serve artifacts via http, and so could be susceptible to a Supply Chain Attack, and it’s from an S3 bucket in a single location, meaning some folk will see slower downloads because they’re geographically far away from where the S3 bucket is being served from.
Fortunately AWS has a solution to both of these problems, it’s called CloudFront. CloudFront is part of the AWS free tier, and they have some simple documentation which covers using CloudFront to provide distributed, HTTPS secured, serving for data which is coming from an S3 bucket, which will take you through how to set everything up.
If you’re providing libraries to others I would recommend setting up CloudFront. You’re not only giving them a better experience through using a CDN to provide your library faster than the S3 bucket would, you’re also giving them confidence that your library has not been altered by a third party at some point between you and them
That’s all folks
Hopefully you’ve found this useful. You’ve now reduced the risk of building up a following for a library using a third party repository, and then being hit by that repository closing, causing a lot of work for your users, and you’ve also given your users an easy way to find the authoritative source for the latest versions of your library.
If you have questions you can find me on Mastodon, GitHub, and Twitter.